Showing posts with label Porch. Show all posts

Saturday

Front Porch Series, Part Five


He says:

We're in the home stretch, now.  All of the structure is in place.  The porch needs to be roofed and checked for leaks, then it can be put on hold until Spring so that we can finish the interior of the house.  

First step is to sheath the roof with the 15/32" plywood.  This is a very thick, heavy-duty type of ply to use for sheathing, but it provides insurance in case of rain during the construction process - it came in handy when we suddenly had 6 inches of rain before the roof was finished!  I could have saved a few hundred dollars using a cheap sheathing, but I probably would have spent the money twice.  Also, lifting those sheets up onto the roof by myself was a workout, I'd like to only do it once.


If you are going to spend a lot of time on a steep roof, wear a safety harness.  The valleys I constructed out of 12" wide metal flashing directly over the sheathing, with edges sealed with roofing cement, then a layer of roofing cement, then the tarpaper, then a layer of cement, then a strip of asphalt roofing roll, then shingles.  This is super overkill, but I'm not a pro roofer.  I want every advantage I can get.


Shingles are time consuming.  There are just so MANY of them.  


And we have a roof.  There are a lot of details I've glossed over (and several weeks of time) but the result makes me so happy.  The little house has a face now.  Much prettier than before.


The plan always was to stop at this point, go back inside and finish the interior...but I couldn't resist seeing what the gable was going to look like...so I mostly finished it:


Yep.  That's our new porch.  

She Says:

Love, love, love it!  It changes the face of the house completely, and actually gives it some character.  And by finishing out the gable, HoneyDo also gave us a sneak peek at our exterior colors for the house to make sure we were happy with them (and by we I mean me); they're perfect!

If you want to see the step by step progress on the porch, go here.

Friday

Front Porch Series, Part Four

He says:

So, after the stone columns were finished, it was time to build a floor.  It is built like a standard deck.  


With the basic floor completed, it would have been on to the rest of the rafters except for the matter of the homeowner's insurance.  As we mentioned here, all they were interested in was a railing.  So although it was a little out of order, we got those all important railings up post haste.


Ok, so, we got that done, and we were approved for insurance renewal.  Onward!  More rafters:


The door is still in the wrong place.  But it's starting to look like something now.  


Got the porch steps done.  Can't wait to move that stupid door!  Next, the roof.

Thursday

Front Porch Series, Part Three

He says:


So, we wanted to include some stonework on this porch.  We like the look of stone column bases, but we also like to do everything ourselves when possible.  The need was for a simple, DIY friendly way to create the stone look.  Now, every big box home improvement store in the world has a stonework display by the front door...but the employees never have any clue what it is, how it installs, or how to order it.  Fail.  After lots of research, we discovered M-Rock.  


Pictures are worth a thousand words, but the phone call clinched the deal.  The people are knowledgeable, friendly, and helpful.  About $1,000 bought everything for the porch and some extra for some future projects.  For something new to us, online videos are always appreciated, and M-Rock has one:


The truck pulled up 4 days later and work began.


I can't say enough nice things about this company and their products.  One or two notes that I wished I would have known:

1.  A regular pine "6x6" post is sized like all pine lumber, smaller.  It's actually 5 1/2 x 5 1/2 ".  A cedar or other decorative post is actually a full 6x6".  The M-Rock product is designed for a full 6x6" post.  In order to use it, I had to add a strip of pressure treated 1/2" ply to two sides of the posts to make up the size difference.  I nailed them on with galvanized ring-shank nails.

2.  The post top caps are a little "vague", they are molded for a very loose fit.  They are to be installed with polyurethane construction adhesive (which is terribly nasty stuff) and you have to use a lot of it.  So, use masking tape to protect the top of the column, and use more tape to hold the cap in place while the adhesive dries.

She Says:

I really love how this turned out!  We wanted the look of stacked stone, and no mortar to mess with.  Very cool product.


Wednesday

Front Porch Series, Part Two

He says:

After the six big posts were installed and cured, we proceeded to cut and install the major beams of the gable section.  


These are two 2x8's laminated together to make 4x8" beams.  This is the basic framework of the gable, eventually the new front door will be placed in the center of the gable section to make a grand entrance.  Once the beams were in place, we installed the ridge beam, a 16 ft long 2x8.  In the below photo, you can see the temporary holder for the ridge beam...when you are working with big heavy pieces of lumber alone, you tend to make a lot of "holders" for things.


Then came the rafters.


And we have a gable.  


Tuesday

Front Porch Series, Part One

He says:

After removing the ugly slab we had a blank canvas to work with, and could design the porch of our dreams.  The house is a little barn-ish without a porch, so we were excited about giving it a pretty face.  We were also excited to have someplace to sit and watch it rain.  That's like our #1 favorite leisure activity, watching rain.  You should try it.

She Says:

Watching it rain is awesome.  Don't knock until you try it.

He Says:

We looked at roughly 5,000 porch photos on the web, but the one we kept coming back to was the photo on the Hardie Siding display at the local Lowe's.  It's difficult to find a high res photo of it, but here it is:


The elements we like are:

1.  Gable on left framing front entrance
2.  Exposed "craftsman" bracing
3.  Stonework pillars

Planning began on this obviously large project.  The total floor area is about 350 sq. ft, with over 400 sq. ft of shingled roof.  To make things more interesting, we don't have the time or budget to completely replace the roof, so the new roof has to be integrated into the existing house roof.  Hmm.  I'll also add here that I am by nature paranoid about things leaking.  

The framework of the porch is as simple as I can possibly make it.  6 pressure-treated posts, 6x6" in size, support the floor and roof.  The floor is built on 2x10" pressure-treated joists and rims, and consists of standard decking boards.  2x8" pine beams support 2x6" pine rafters, holding up 15/32" ply roof deck.  Asphalt shingles go on top.  Simple, no?  Let's begin with a "before" photo:


Step one:  Dig holes, install posts.


Thank goodness for a tractor and friend willing to help on a Saturday.  If you are contemplating a similar project note a few things:  We set the posts 48" deep in 12" diameter holes.  This left room for 120 lbs (3 x 40lb bags) of concrete per hole.  Although local contractors often pour dry cement into these types of holes and let the moisture in the soil cure it, I don't.  We mixed the Quickcrete in my awesome little Kobalt brand cement mixer.  The easy way to mix is to cut a slit into the side of the bag and dump the entire bag into the mixer.  Run the mixer for a few seconds and it magically empties the bag.  Stop the mixer and easily remove the now-empty bag.  Viola.

Mix your concrete to the consistency of runny oatmeal.  Note that we are using bungee cords to hold levels tight onto the post all during the pouring process, and that we are using wooden stakes pounded into the ground to support the big posts via 2x4 diagonals.  Allow the concrete to cure at least 24 hours.  


One.


Two.


ThreeFourFiveSix.

She Says:

HoneyDo has spent a lot of time designing this porch, both structurally and architecturally.  As usual, I say, "What about adding this *insert difficult detail* or that *insert impossible feat*?"  He gives me a long, sideways glance, then figures out a way to make it work.  He's awesome like that.

I can't wait for you to see more of it!


Monday

Front Porch Demolition: The Prequel

He says:

The house came equipped with a slab.  No, we don't really know why, it was apparently someone's idea of a front porch, but why you would build one like this is beyond us.  It was a giant concrete block.  It must have been terribly expensive to do like this, and it had the fantastic feature of sloping toward the house...so all the water it collected sat against the front of the house.  Wonderful.

She Says:

In addition, our homeowner's insurance agent took one look at this thing and said, "No Way."  He insisted that the "porch" had to have a railing.  Now we had no intention of keeping this thing, let alone spending time and money putting a railing on it (how would you even do that anyway?  Talk about putting lipstick on a pig!)  So we halted progress inside and turned our attention to The Slab.


He Says:

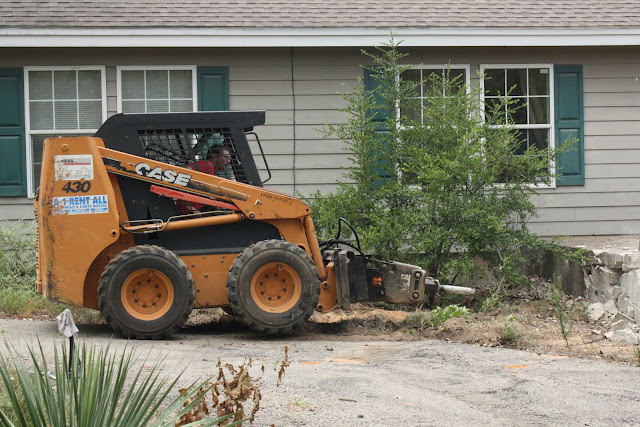
In the above photo, I have removed the steps from the front and we're ready to demolish it.  Demo on this, however, is no small matter.  Being made of 4-6" thick aged concrete with rebar, we needed a very large tool.  Enter the skid loader.


A skid loader is a utility tractor that has many types of interchangeable implements that are carried on articulated arms in front.  For this job, we needed a power jackhammer and a scooper bucket.  A trip to the rental company, $300, and we had it for 24 hours.


We broke the slab into little pieces and scooped them into a pile at the edge of the yard.  It made a big pile.  It took about 6 hours of steady work to fully remove the slab, but when we were done, we had room for a new (proper) porch and we could start to repair the water damage the slab had caused.


Next step - design and build a front porch.