Showing posts with label Demolition. Show all posts

Tuesday

Great Room Demo

She Says:


The Great Room demo project started big, then it just got bigger.  And bigger.


Initial plans were to tear out the interior hall closets to devote more space to the living area (open concept and all that), but one day, over fajitas at our favorite Mexican restaurant, we thought, "Heck, what do we need an extra bedroom for?  Let's take it and make it part of the great room!"


So we did.

We also decided we didn't like where the front door was located; it had to be moved.  And we (again initially) planned to just replace the existing windows with larger ones, but as the room grew, so did our imaginations.  We made up our minds to completely blow out the exterior wall, rebuild it, and fill it with windows.  Genius?  Or madness?

And then there was The Great Ceiling Debate.  More on that later; suffice to say for now that it tacked on about a month of work.

We did a lot of the interior demo in pieces, in between the other work we were doing.  A closet here, a wall there.  But then the day came that the exterior wall had to come down.  Now remember, we live in this house.  As in, all the time.  With no place else to go.  So the wall had to come down and go back up again as quickly as possible.  Stay tuned...


Saturday

Kitchen Demo

She Says:

And so the Kitchen demo starts.  


Before...


Those upper cabinets came down waaaaay to easy.  (Shudders)


Bottom cabinets and soffits come out.  Why is everything splattered with soy sauce?


Tile and final lower cabinets gone.


Room with a view of the Laundry...


And just for the sympathy vote, here are some shots of our "working kitchen" as we progress... a fridge, a microwave and a card table... what else do we really need?

Bath Demo and Construction

She Says:

I was so eager to gut this room that I neglected to take any demo pictures.  So just imagine me ineffectually swinging a sledgehammer amid a haze of drywall dust.

Here's the whole room gutted.  In this photo, we've already built the header for the window and put it in place.


HoneyDo wired the electrical.  We replaced the vanity light with two sconces and added LED can lights above the vanity and shower.


And here's the exterior wall all snug and insulated:


The reason for the rocking toilet was, once again, water damaged, rotted flooring.  Left to its own devices, one of these days it would have just rocked its way right down into the crawl space.


Okay, maybe I'm being overly dramatic.  I guess the floor joists would have prevented a free fall.  But we added extra blockers on either side of the repair just to be sure.

Thankfully, the vanity had absorbed all its own leaks over the years, and the only areas that needed work were around the base of the toilet and the drain under the tub.  The rotten areas were easily removed and patched.


He Says:

So bathrooms are pretty important for quality of life.  Even though this house has another functional bathroom, it's nasty, and we want out of it.  So, we decided to simplify the reno of this room by not moving the location of any of the plumbing or venting.  If we were going to move any fixtures, it would require new access holes in wall studs and the roof for the vent stacks.  We'll save that fun for the next bathroom.


Instead, we replaced the water supply plumbing with PEX.  It's not a good idea (if you are a DIYer) to close up a plumbing installation behind a wall before you test it.  With PEX, it is easy and cheap to install a test plug at any point in the system temporarily.  With our handy dandy water manifold system, we can pressurize any room in the house individually for testing, which is awesome.

Okay, next, let's put up some walls...

Monday

Front Porch Demolition: The Prequel

He says:

The house came equipped with a slab.  No, we don't really know why, it was apparently someone's idea of a front porch, but why you would build one like this is beyond us.  It was a giant concrete block.  It must have been terribly expensive to do like this, and it had the fantastic feature of sloping toward the house...so all the water it collected sat against the front of the house.  Wonderful.

She Says:

In addition, our homeowner's insurance agent took one look at this thing and said, "No Way."  He insisted that the "porch" had to have a railing.  Now we had no intention of keeping this thing, let alone spending time and money putting a railing on it (how would you even do that anyway?  Talk about putting lipstick on a pig!)  So we halted progress inside and turned our attention to The Slab.


He Says:

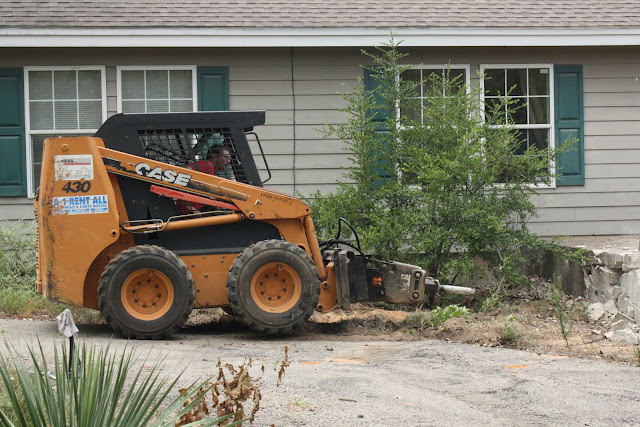
In the above photo, I have removed the steps from the front and we're ready to demolish it.  Demo on this, however, is no small matter.  Being made of 4-6" thick aged concrete with rebar, we needed a very large tool.  Enter the skid loader.


A skid loader is a utility tractor that has many types of interchangeable implements that are carried on articulated arms in front.  For this job, we needed a power jackhammer and a scooper bucket.  A trip to the rental company, $300, and we had it for 24 hours.


We broke the slab into little pieces and scooped them into a pile at the edge of the yard.  It made a big pile.  It took about 6 hours of steady work to fully remove the slab, but when we were done, we had room for a new (proper) porch and we could start to repair the water damage the slab had caused.


Next step - design and build a front porch.